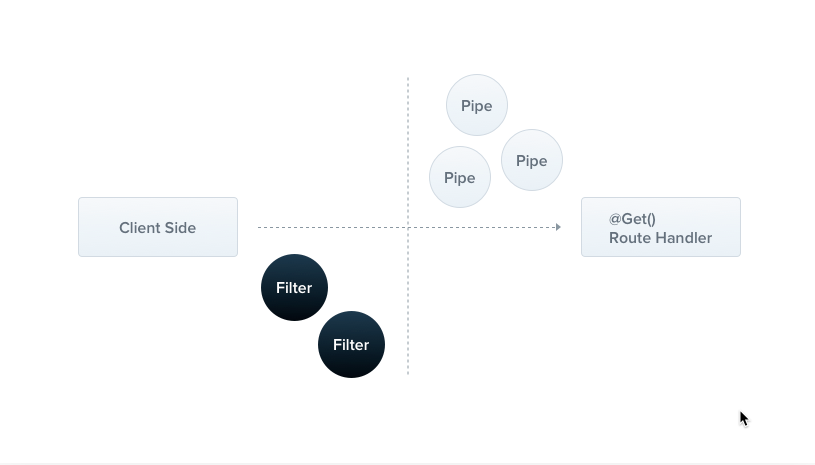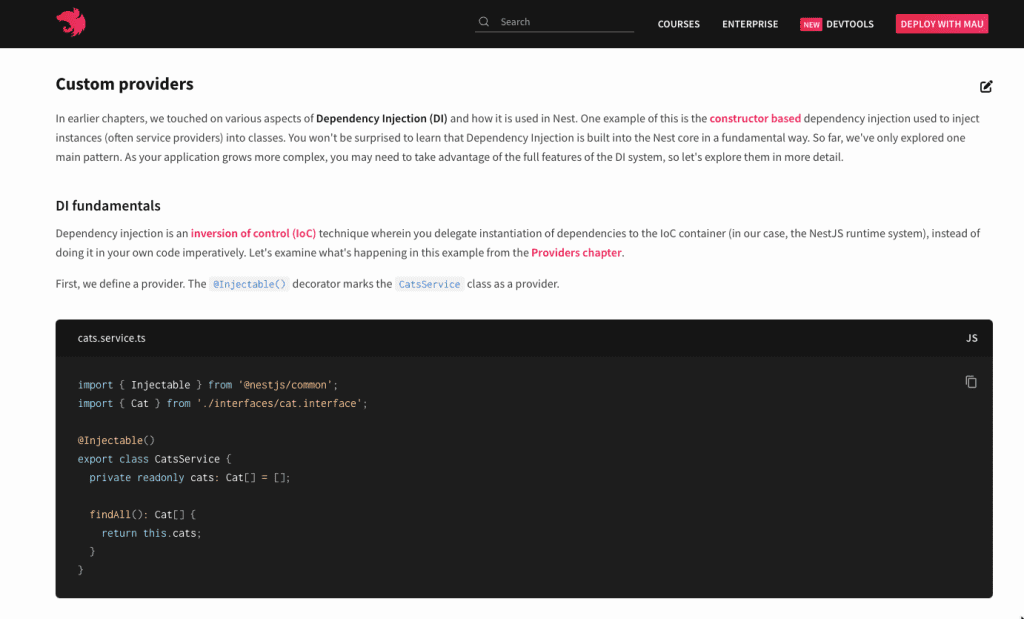

Chắc hẳn ai trong số các lập trình viên NodeJS đều đã từng nghe qua hoặc sử dụng qua NestJS Framework, nhưng liệu mọi người đã thực sự hiểu về các tầng layer trong NestJS chưa ? Sự hiểu tới đâu ? Và một vòng đời khi 1 request gửi tới Server NestJS nó sẽ phải đi qua những khâu nào ? Hãy cùng mình tìm hiểu dưới đây nhé
1. Tại sao phải hiểu vòng đời NestJS Request?
Trong quá trình học tập và làm việc với NestJS, bạn sẽ trải qua vô số lần debug code để tìm lỗi hoặc hiểu nguyên nhân gốc rể tại sao code của bản thân không hoạt động. Các bạn sẽ tìm mãi nhưng không thể chuyện gì đang xảy ra và bắt đầu lo lắng.
Thường thì mình sẽ bối rối và bắt đầu tìm các anh Lead hoặc senior giúp đỡ. Nhưng khoan đã, hãy bình tĩnh, các bạn đã check hết các trường hợp có thể chưa ? Theo mình nghĩ là chưa đâu.
Và NestJS request life cycle có thể là khái niệm các bạn cần tìm hiểu khi nghiên cứu về NestJS, khái niệm này sẽ giúp các bạn hiểu sau hơn về framework này. Ok let’s go
2. Cách vòng đời NestJS hoạt động (Tổng quan)
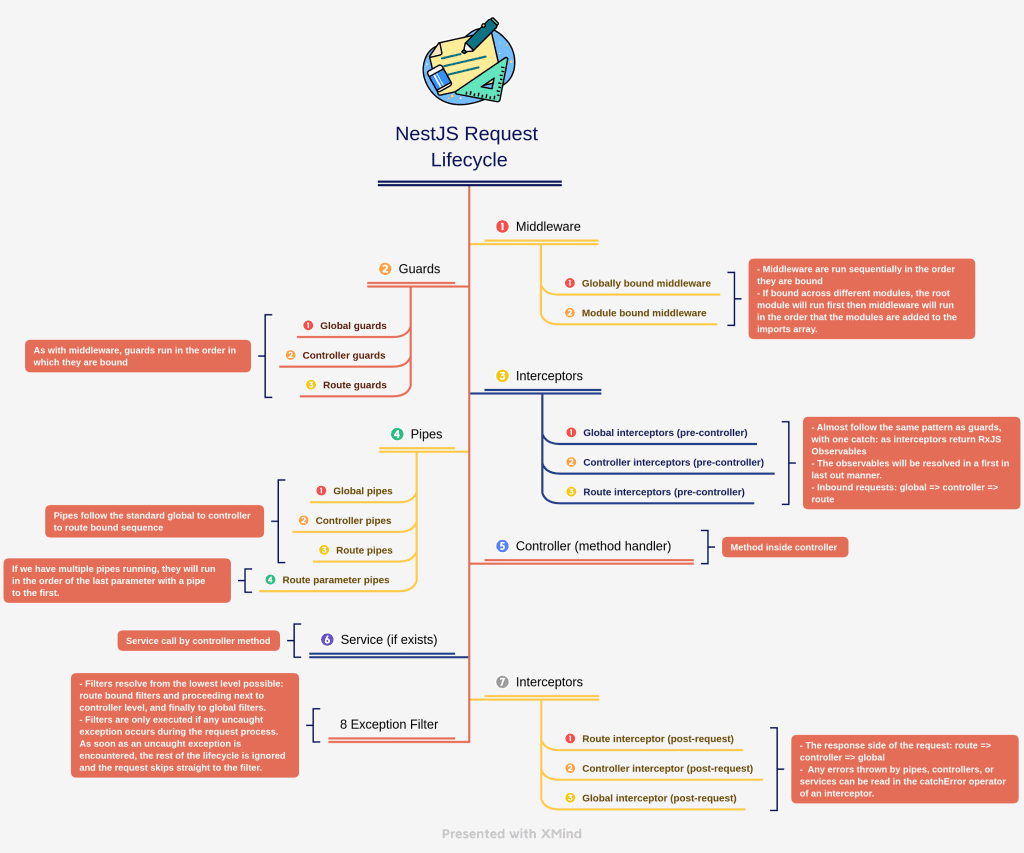
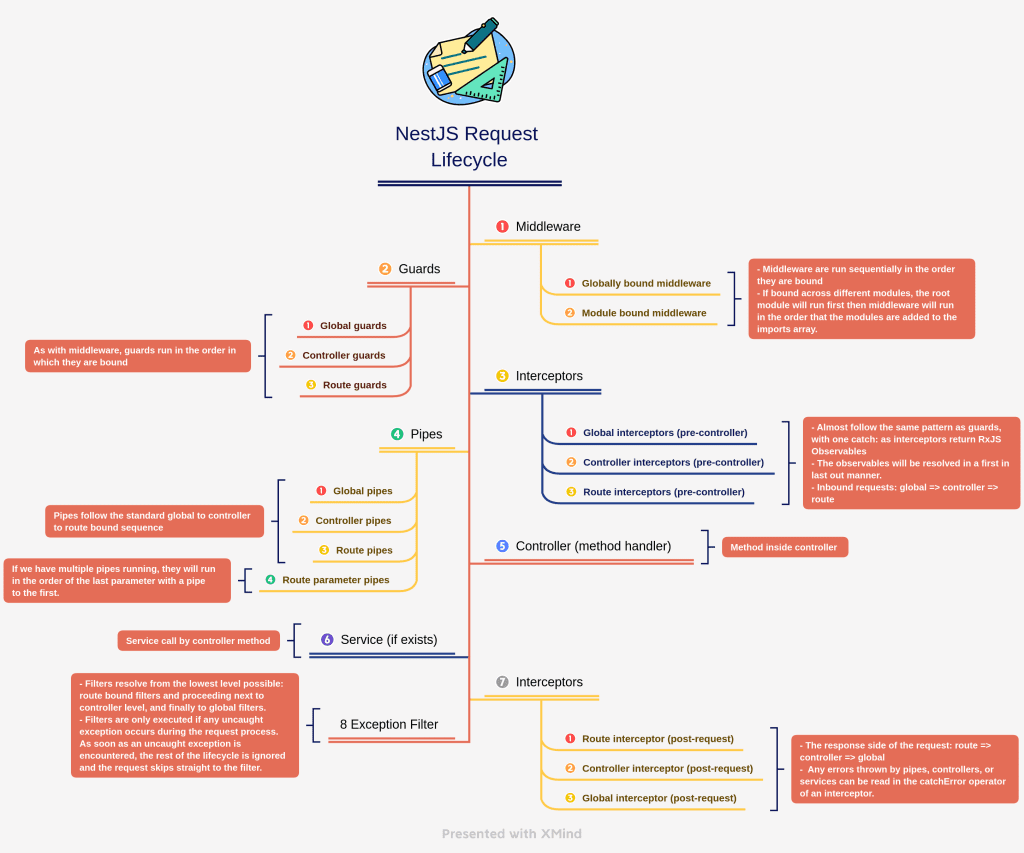
Nhìn vào hình ảnh trực quan ở trên các bạn có thể thấy lần lượt thứ tự mà một request (yêu cầu) gửi đến server và trả ra sẽ đi như thế nào. Đầu tiên request sẽ đi qua:
1. Middleware (mình gọi là người trung gian)
2. Guards. Sau đó đến Guards (lớp bảo vệ) – ở Guard thường sẽ có nhiều loại khác nhau, mình sẽ đề cập chi tiết ở bài viết khác
3. Interceptors: Dịch nghĩa đơn giản là người can thiệp vào (interceptor thường nằm ở lượt đi gửi lên và lượt gửi về)
4. Pipes: Có thể gọi nôm na là một ống dẫn biến đổi – thường được dùng để biến đổi, xác thực và làm sạch dữ liệu gửi đến trước khi nó gặp Controller. Đọc thêm ở đây: https://chatgpt.com/share/62b48907-b7df-4d92-b2f0-adea708ace06
5. Controller (đây là một class định tuyến cho các request đến các route cụ thể trong)
6. Service (Phần xử lý bussiness logic của các dev)
7. Interceptors: Lượt về
8. Exception filter (lọc ra những phần lỗi ở đâu – thường thì các lỗi của ứng dụng sẽ đi ra ở đây. Nếu ứng dụng bắt được lỗi thì sẽ đi trực tiếp vào exception filter này và mặc kệ các lớp khác kể trên)
Trên là tổng quan những gì một Request gửi đến Server NestJS sẽ đi qua! Tiếp theo mình sẽ đi sâu vào chi tiết nhé
3. Middleware trong vòng đời NestJS
Đầu tiên ta sẽ nói về middleware. Được gọi đầu tiên khi request gửi đến server, chúng ta thường dùng để xử lý và thay đổi thông tin request truocdws khi truyền đến router handler (controller).
3.1 Global Middleware
Middleware global được đăng ký trên toàn ứng dụng. Dễ dàng có thể thấy các package sử dụng middlware như cor, body-parser,…
Ngoài ra ta có thể custom lại một middleware như sau:
import { Logger } from '@nestjs/common';
import { NestFactory } from '@nestjs/core';
import { Request, Response, NextFunction } from 'express';
import helmet from 'helmet';
import { AppModule } from './app.module';
// Bootstrap mang ý nghĩa là hàm bắt đầu
async function bootstrap() {
  const logger = new Logger(bootstrap.name);
  const app = await NestFactory.create(AppModule);
  // NOTICE: GLOBAL MIDDLEWARE
  app.use(helmet());
  // Custom middlware here!
  app.use((req: Request, res: Response, next: NextFunction) => {
    logger.debug('===TRIGGER GLOBAL MIDDLEWARE===');
    next();
  });
  await app.listen(3000);
}
bootstrap();
3.2 Module Bound middleware
Middleware module là phần middleware có thể sử dụng trong một module bất kỳ trong NestJS để thực hiện chức năng với mục đích riêng.
Ví dụ dùng middleware riêng cho một module.
import { Injectable, NestMiddleware } from '@nestjs/common';
import { Request, Response, NextFunction } from 'express';

@Injectable()
export class VersionMiddleware implements NestMiddleware {
  logger = new Logger(VersionMiddleware.name);
  use(req: Request, res: Response, next: NextFunction) {
    // NOTICE: MODULE BOUND MIDDLEWARE
    this.logger.debug('===TRIGGER MODULE BOUND MIDDLEWARE===');
    const appVersion = req.headers['x-app-version'];
    if (!appVersion || appVersion !== '2.0.0')
      throw new BadRequestException('Invalid App Version');
    next();
  }
}
Hàm này yêu cầu người dùng phải truyền trên header là với đoạn string. x-app-version = 2.0.0. Thì mới có thể được call request lên server và thực thi các bước tiếp theo. Sau khi tạo hàm này xong trong một file riêng thì ta sẽ gọi trong app module như sau:
import { MiddlewareConsumer, Module, NestModule } from '@nestjs/common';
import { AppController } from './app.controller';
import { AppService } from './app.service';
import { VersionMiddleware } from './middlewares/version.middleware';
import { FlashCardsModule } from './modules/flash-cards/flash-cards.module';

@Module({
  imports: [FlashCardsModule],
  controllers: [AppController],
  providers: [AppService],
})
export class AppModule implements NestModule {
  configure(consumer: MiddlewareConsumer) {
    consumer.apply(VersionMiddleware).forRoutes('flash-cards');
  }
}
Trong đoạn mã trên ta đã config trong class AppModule nằm trong hàm configure. Lúc này các route xuất phát với /flash-cards/ đều sẽ không thể truy cập nếu thanh header không có đoạn string như trên! x-app-version = 2.0.0
4. Guards trong vòng đời nestjs
Như đúng cái tên của nó, mục đích của Guard là để xác định xem các request có được cho phép gửi lên route handler hay không. Về bản chất có thể thấy Guard và Middleware là khá giống nhau. Nhưng với middleware thì khi gọi hàm next() thì không thể biết handler nào sẽ được gọi trươc đó. Ngược lại với Guard nhờ việc có thể truy cập trực tiếp vào Excecution Context instance nên có thể biết được handler nào tiếp theo sẽ được gọi sau khi gọi hàm next(). Việc xử dụng guard này giúp ta đưa logic xử lý vào quy trình một cách gọn gàng và dễ , tách biệt giữa guard và middleware, giúp code dễ đọc và dễ bảo trì.
Theo mình chúng ta nên dùng Middleware khi cần xử lý và thay đổi các thông tin yêu cầu, còn Guards thì sử dụng để bảo vệ tài nguyên của ứng dụng bằng cách kiểm tra các điều kiện nhất định.
Theo ý kiến của tác giả gốc bài viết về Request life cycle này thì:
Chúng ta nên dùng Middleware khi cần xử lý và thay đổi các thông tin yêu cầu, còn Guards thì sử dụng để bảo vệ tài nguyên của ứng dụng bằng cách kiểm tra các điều kiện nhất định.
4.1 Global Guard
Sử dụng @nestjs/throttler để giới hạn request gọi đến một API nhất định, gửi quá giới hạn sẽ báo lỗi
...
@Module({
  imports: [
    ThrottlerModule.forRoot({
      ttl: 60,
      limit: 10, // Giới hạn số request có thể truy cập trong thời gian ttl
    }),
    ...
  ],
})
export class AppModule {}
Trên là cách setup cho toàn bộ ứng dụng, và làm sao để theo dõi đường đi của request ? hãy xem bên dưới
import { ExecutionContext, Logger } from '@nestjs/common';
import { ThrottlerGuard } from '@nestjs/throttler';
// Tạo một custom kế thừa từ ThrottlerGuard global
export class CustomThrottlerGuard extends ThrottlerGuard {
  logger = new Logger(CustomThrottlerGuard.name);
  canActivate(context: ExecutionContext): Promise<boolean> {
    this.logger.log('===TRIGGER GLOBAL GUARD===');
    return super.canActivate(context);
  }
}
...
@Module({
  imports: [
    ThrottlerModule.forRoot({
      ttl: 60,
      limit: 10,
    }),
    FlashCardsModule,
  ],
  controllers: [AppController],
  providers: [
    AppService,
    {
      provide: APP_GUARD,
      useClass: CustomThrottlerGuard,
    },
  ],
})
export class AppModule implements NestModule {
  configure(consumer: MiddlewareConsumer) {
    consumer.apply(VersionMiddleware).forRoutes('flash-cards');
  }
}
Như phương thức trên ta đã override lại các class mặc định và sử dụng class CustomThrottlerGuard. Kể từ giờ khi các request sẽ được log lại và biết được đi đâu!
4.2 Controller Guards
Thường được dùng với JWT Authentication, nên chúng ta sẽ xem ví dụ sau đây.
Đầu tiên ta sẽ tạo một file có tên jwt-auth.guard.ts trong folder src/guards/
import {
  Injectable,
  CanActivate,
  ExecutionContext,
  Logger,
} from '@nestjs/common';
import { Observable } from 'rxjs';

@Injectable()
export class JwtAuthorizationGuard implements CanActivate {
  logger = new Logger(JwtAuthorizationGuard.name);
  canActivate(
    context: ExecutionContext,
  ): boolean | Promise<boolean> | Observable<boolean> {
    // NOTICE: CONTROLLER GUARD
    this.logger.log('===TRIGGER CONTROLLER GUARD===');
    // IMPLEMENT JWT GUARD LOGIC HERE
    return true;
  }
}
...
@UseGuards(JwtAuthorizationGuard) // Sử dụng Guard JWT ở đây!
@Controller('flash-cards')
export class FlashCardsController {
  constructor(private readonly flashCardsService: FlashCardsService) {}

  @Get()
  async findAll() {
    return await this.flashCardsService.findAll();
  }
  ...
4.3 Route guards
Guard cuối cùng trong các loại guard, thường dùng cho các guards có tính chất riêng.
Ví dụ: Tạo ra một OwnershipGuard để handle trường hợp:
import {
  Injectable,
  CanActivate,
  ExecutionContext,
  Logger,
} from '@nestjs/common';
import { Observable } from 'rxjs';

@Injectable()
export class OwnershipGuard implements CanActivate {
  logger = new Logger(OwnershipGuard.name);
  canActivate(
    context: ExecutionContext,
  ): boolean | Promise<boolean> | Observable<boolean> {
    // NOTICE: ROUTE GUARD
    this.logger.log('===TRIGGER ROUTE GUARD===');
    // IMPLEMENT QUERY FLASH-CARD DATA AND CHECK OWNERSHIP
    return true;
  }
}
Thêm vào method update
...
  @Patch(':id')
  @UseGuards(OwnershipGuard)
  update(
    @Param('id') id: string,
    @Body() updateFlashCardDto: UpdateFlashCardDto,
  ) {
    return this.flashCardsService.update(+id, updateFlashCardDto);
  }
  ```
Nhìn vào OwnershipGuard ở trên ta dễ dàng thấy Route guard sẽ thường bảo vệ từng route cụ thể so với controller route hoặc là global route
Tóm lại: Thứ tự của route luôn đi từ Global -> cho đến module -> từng route như vậy cho dễ nhớ và dễ hiểu.
5. Interceptor
Tiếp đến chủ đề inteceptor chúng cho phép chúng ta xử lý các request và response trước khi chúng được xử lý bởi controller hoặc được trả về cho client. Vì thế chúng ta có thể chèn thêm custom logic vào quá trình xử lý request và response của ứng dụng.
Các trường hợp sử dụng interceptor:
- Logging
- Caching (Làm sao để lưu cache ở đây ? Mình sẽ cố gắng tìm hiểu và thêm kiến thức ở đây!)
- Transformation
- Error handling
5.1 Global interceptors
import {
  Injectable,
  NestInterceptor,
  ExecutionContext,
  CallHandler,
  Logger,
} from '@nestjs/common';
import { Observable } from 'rxjs';
import { tap } from 'rxjs/operators';

@Injectable()
export class LoggingInterceptor implements NestInterceptor {
  logger = new Logger(LoggingInterceptor.name);
  intercept(context: ExecutionContext, next: CallHandler): Observable<any> {
    // NOTICE: GLOBAL INTERCEPTOR
    this.logger.warn('===TRIGGER GLOBAL INTERCEPTOR (PRE)===');

    const now = Date.now();
    return next.handle().pipe(
      tap(() => {
        logger.log(`After... ${Date.now() - now}ms`);
        // NOTICE: GLOBAL INTERCEPTOR
        this.logger.warn('===TRIGGER GLOBAL INTERCEPTOR (POST)===');
      }),
    );
  }
}
Đây là ví dụ về cách logger ghi lại thông tin của dữ liệu trước khi gửi đến API và trả ra phản hồi dữ liệu đến người dùng.
import { LoggingInterceptor } from './interceptors/logging.interceptor';
...
async function bootstrap() {
  const logger = new Logger(bootstrap.name);
  const app = await NestFactory.create(AppModule);
  // Thêm vào đây
  app.useGlobalInterceptors(new LoggingInterceptor());
  // NOTICE: GLOBAL MIDDLEWARE
  app.use(helmet());
  app.use((req: Request, res: Response, next) => {
    logger.debug('===TRIGGER GLOBAL MIDDLEWARE===');
    next();
  });
  await app.listen(3000);
}
bootstrap();
Lưu ý là thêm vào main.ts để tạo ra global interceptor.
6. Pipes
Mục đích chính của Pipe là để kiểm tra, chuyển đổi và dữ liệu gửi và nhận về client
Các trường hợp khi nên sử dụng Pipe bao gồm:
Xác thực dữ liệu: Kiểm tra xem dữ liệu được gửi từ client có đúng định dạng và hợp lệ hay không ?
Chuyển đổi dữ liệu: Đổi định dạng gửi từ client thành dạng dữ liệu mà server có thể hiểu được hoặc ngược lại!
Sàng lọc dữ liệu: Loại bỏ dữ liệu không cần thiết
6.1 Global Pipes
Chúng ta không còn xa lạ gì với class-validator khi dùng NestJS, đó là 1 package thông dụng dùng Global Pipes mà chúng ta dùng trong hầu hết các trường hợp
6.2 Controller Pipes
Thường sẽ dùng Validation Pipe tuỳ theo trường hợp vì thế 2 phần này ta sẽ tạo một ví dụ minh hoạ cách setup và đặt controller pipe trong ứng dụng
import {
  ArgumentMetadata,
  Injectable,
  Logger,
  PipeTransform,
} from '@nestjs/common';

@Injectable()
export class ParseControllerValidationPipe implements PipeTransform<string> {
  logger = new Logger(ParseControllerValidationPipe.name);
  transform(value: string, metadata: ArgumentMetadata): string {
    // NOTICE: CONTROLLER PIPE
    this.logger.verbose('===TRIGGER CONTROLLER PIPE===');
    return value;
  }
}
Thêm vào flash-cards controller
import { ParseControllerValidationPipe } from 'src/pipes/parse-custom-validation-controller.pipe';
...
@UseInterceptors(TimeoutInterceptor)
@UseGuards(JwtAuthorizationGuard)
@UsePipes(ParseControllerValidationPipe)
@Controller('flash-cards')
export class FlashCardsController {
...
}
6.3 Route pipes
import {
  ArgumentMetadata,
  Injectable,
  Logger,
  PipeTransform,
} from '@nestjs/common';

@Injectable()
export class ParseRouteValidationPipe implements PipeTransform<string> {
  logger = new Logger(ParseRouteValidationPipe.name);
  transform(value: string, metadata: ArgumentMetadata): string {
    // NOTICE: ROUTE PIPE
    this.logger.verbose('===TRIGGER ROUTE PIPE===');
    return value;
  }
}
import { ParseRouteValidationPipe } from 'src/pipes/parse-custom-route-validation.pipe';
...
@Get()
@UseGuards(OwnershipGuard)
@UseInterceptors(ExcludeNullInterceptor)
@UsePipes(ParseRouteValidationPipe)
async findAll(@Query('limit') limit) {
    this.logger.log(`Method name: ${this.findAll.name}`);
    return await this.flashCardsService.findAll();
}
...
6.4 Route parameter pipes
import {
  ArgumentMetadata,
  BadRequestException,
  Injectable,
  Logger,
  PipeTransform,
} from '@nestjs/common';
import { isObjectIdOrHexString } from 'mongoose';

@Injectable()
export class ParseMongoIdPipe implements PipeTransform<string> {
  logger = new Logger(ParseMongoIdPipe.name);
  transform(value: string, metadata: ArgumentMetadata): string {
    // NOTICE: ROUTE PIPE
    this.logger.log('===TRIGGER ROUTE PARAMS PIPE===');
    if (!isObjectIdOrHexString(value)) {
      throw new BadRequestException('Invalid ID');
    }
    return value;
  }
}
Sử dụng
import { ParseMongoIdPipe } from 'src/pipes/parse-mongo-id.pipe';
import { ObjectId } from 'mongoose';
...
@Get(':id')
@UseInterceptors(ExcludeNullInterceptor)
findOne(@Param('id', ParseMongoIdPipe) id: ObjectId) {
    return this.flashCardsService.findOne(id);
}
  ...
7. Controller
Phần này dùng để sử lý các route handler của ứng dụng NestJS
8. Service
Service là nơi mà Controller gọi tới để xử lý yêu cầu, hoặc cũng có thể không cần gọi tới nếu bản thân Controller có thể tự giải quyết được. Nhìn chung Service là nơi mà các lập trình viên chúng ta sẽ sử lý nghiệp vụ!
9. Exception filter
Khác với NodeJS thuần, khi gặp exceptions ứng dụng sẽ bị crash, Exception filter được NestJS tạo ra để xử lý các ngoại lệ (exceptions) trong ứng dụng. Nó giúp chúng ta kiểm soát và định hướng các ngoại lệ xảy ra trong ứng dụng và trả về một phản hồi thích hợp cho user. Nếu các exceptions không được chúng ta tự handle thì sẽ được chuyển đến cho Exception Filter xử lý.
Để hiểu rõ hơn về exception filters trong NestJS thì mình có một bài viết tại đây nhé!
10. Kết luận
Link bài viết gốc tham khảo:
https://viblo.asia/p/cach-request-lifecycle-hoat-dong-trong-nestjs-y3RL1awpLao
Tham khảo thêm các bài viết về series NestJS của mình nhé!
Tham khảo docs: https://docs.nestjs.com/faq/request-lifecycle